Introduction to Delicious Apple Bars
Why Homemade Apple Bars Are a Must-Try?
Let’s be honest: nothing says comfort quite like the sweet scent of apples baking in the oven. If you’ve ever tasted a homemade apple bar, you know they’re not just a dessert; they’re a warm hug in a slice. Even better, they’re incredibly versatile and can be enjoyed for breakfast, dessert, or as a snack throughout the day.
So, why should you put homemade apple bars on your must-try list? For starters, they are a delightful way to showcase seasonal apples. Whether it’s crisp, tart Granny Smith or sweet Honeycrisp, apples offer a variety of flavors that transform into something magical when baked. When you whip up a batch of these bars, you get to choose not only the type of apples you prefer but also control the sweetness and spices—making them perfectly suited to your taste.
Moreover, creating these bars at home allows you to leave out preservatives and artificial ingredients, which you might find in store-bought versions. By using fresh, simple ingredients, you can indulge guilt-free. If you want to dive deeper into the health benefits of apples, check out this article from the USDA on the nutritional value of this incredible fruit.
Have you ever considered making these bars for a gathering? They’re sure to impress friends and family, and trust me, the aroma alone will draw everyone to your kitchen. Share them at a picnic or a potluck—just be ready to share the recipe! If you like to get creative, you can even add nuts or caramel for an extra twist.
Feeling inspired yet? Get excited about making your very own apple bars, because they are not only simple to prepare but also offer a delightful balance of flavor and texture. With crispy edges, a soft center, and a hint of cinnamon, these bars are impossible to resist. So grab your apron, and let’s gather those apples. Your future self will thank you!
Ingredients for Apple Bars
Creating delicious apple bars starts with selecting the best ingredients. Let’s dive into what you’ll need to whip up this delightful treat in your kitchen.
Fresh Apples
- 2-3 medium apples (like Granny Smith or Honeycrisp)
- Be sure to peel and core them for that perfect texture.
Baking Essentials
- 1 cup all-purpose flour: The base of our bars.
- ½ cup rolled oats: Adds a lovely chewiness.
- 1 teaspoon baking powder: For a fluffy lift!
- ½ teaspoon cinnamon: A warm touch that complements the apples beautifully.
Sweetness & Flavor
- ½ cup brown sugar: Gives a rich, caramel-like sweetness.
- ¼ cup granulated sugar: Balances out the flavors.
- ⅓ cup unsalted butter, melted: Because everything’s better with butter!
Optional Add-ins
- Chopped nuts (like walnuts or pecans) for a lovely crunch.
- Raisins or cranberries can introduce a nice tartness.
These simple components come together to create blissful apple bars that are sure to impress! Check out more tips on selecting the best apples here. Enjoy baking!
Preparing Apple Bars
There’s something undeniably comforting about homemade apple bars. They remind you of fall, family gatherings, and warm kitchens filled with delightful aromas. If you’re ready to embark on a tasty journey to create these scrumptious treats, let’s dive into the steps.
Gather Your Ingredients
Before you start whipping up those delicious apple bars, make sure you have all your ingredients ready to go. This not only saves time but also ensures you won’t be scrambling around mid-recipe. For this delightful treat, you’ll need:
-
For the crust:
-
1 ½ cups all-purpose flour
-
½ cup sugar
-
½ cup unsalted butter (softened)
-
1 egg yolk
-
1 teaspoon vanilla extract
-
A pinch of salt
-
For the apple filling:
-
3 to 4 cups peeled and sliced apples (such as Granny Smith or Honeycrisp)
-
½ cup sugar
-
2 tablespoons lemon juice
-
1 teaspoon cinnamon
-
2 tablespoons cornstarch
Having everything prepped and laid out makes the process smoother and more enjoyable. Plus, it gives you that professional kitchen feel!
Make the Crust
Now that you’ve gathered your ingredients, it’s time to create the base for your apple bars.
- In a mixing bowl, combine the flour, sugar, and salt.
- Add in the softened butter, and mix until the mixture resembles coarse crumbs. This step can be fun; it’s like playing with dough!
- Mix in the egg yolk and vanilla extract until everything is well combined.
- Press the mixture into a greased square baking pan (usually 9×9 inches works well). Make sure to spread evenly, creating an even crust.
This buttery crust is what holds your delicious apple filling, so take your time to get it just right!
Prepare the Apple Filling
While the crust is coming together, it’s time to turn our attention to the apple filling. With apples being the star of this dish, choose a mix of sweet and tart to balance the flavors beautifully.
- In a large bowl, toss your sliced apples with sugar, lemon juice, cinnamon, and cornstarch.
- If you’re feeling adventurous, consider adding a pinch of nutmeg or even a splash of apple cider for that extra zing.
- The cornstarch will help thicken the filling while baking, preventing it from being too runny.
Let that filling sit for a minute while you start visualizing your apple bars baking to perfection in the oven.
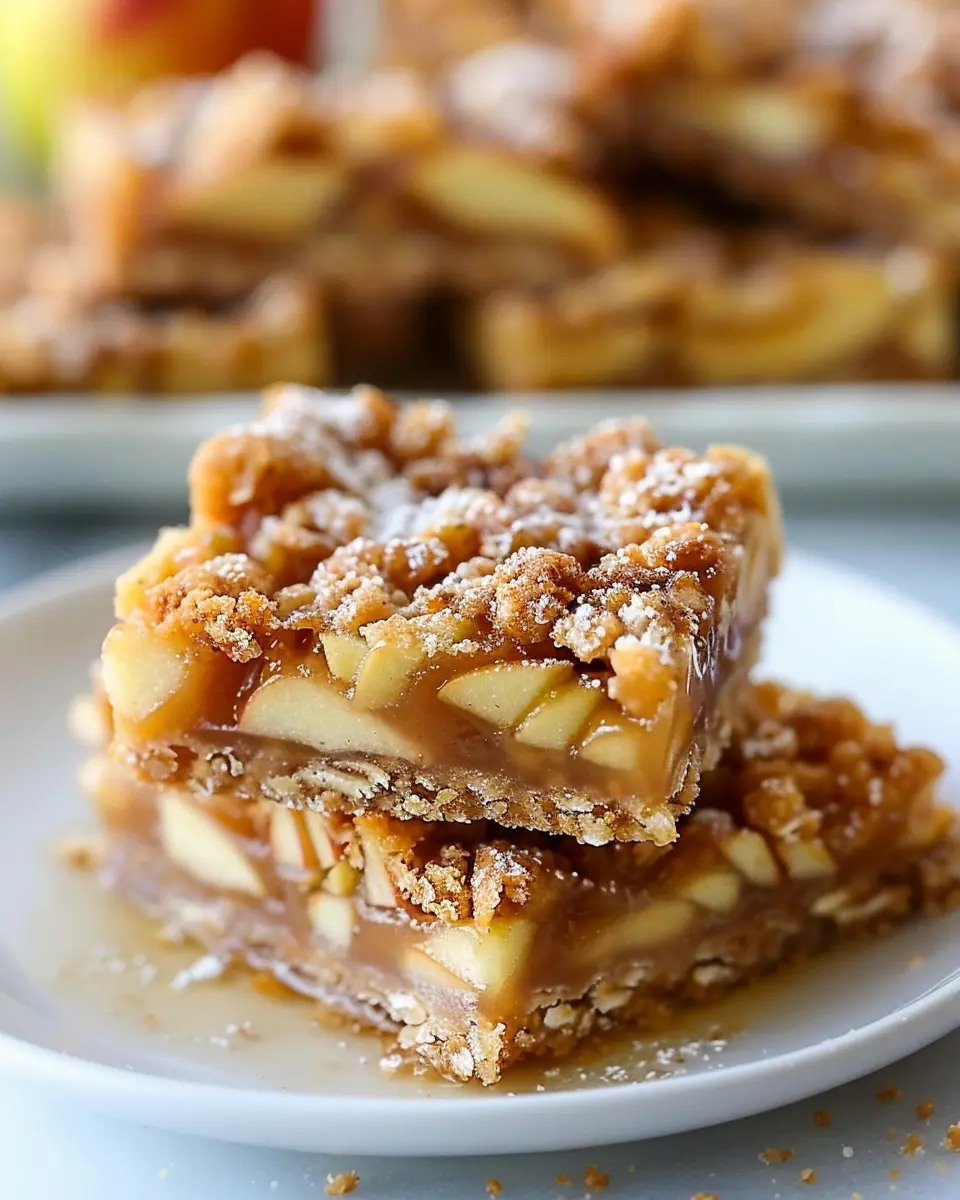
Assemble the Bars
With the crust and filling ready, it’s time for the exciting part—assembly!
- Pour the apple filling over the prepared crust, spreading it evenly.
- You can take any leftover crust mixture and crumble it on top for a lovely, crisp topping. This adds texture and flavor!
- Preheat your oven to 350°F (175°C) while you finish assembling.
Are you already picturing the aroma wafting through your kitchen? I sure am!
Bake to Perfection
Place your assembled apple bars into the preheated oven. Baking time typically ranges from 35 to 45 minutes, or until the top is golden brown and the apples are bubbling.
- Tips:
- Keep an eye on them as they near the end of baking. If the edges turn too dark, you can cover them lightly with foil.
- After removing from the oven, let them cool before slicing—this will help the filling set up nicely.
Once they cool (if you can resist), slice them into squares, serve, and enjoy! You’ll have a delightful treat to share—if you don’t eat them all yourself first!
Creating apple bars is not just about following a recipe; it’s about enjoying the process. So, gather your ingredients, turn on your favorite playlist, and start baking! Happy cooking!
For more cooking tips and delightful recipes, check out some of my favorite cooking blogs like Serious Eats or Bon Appétit.
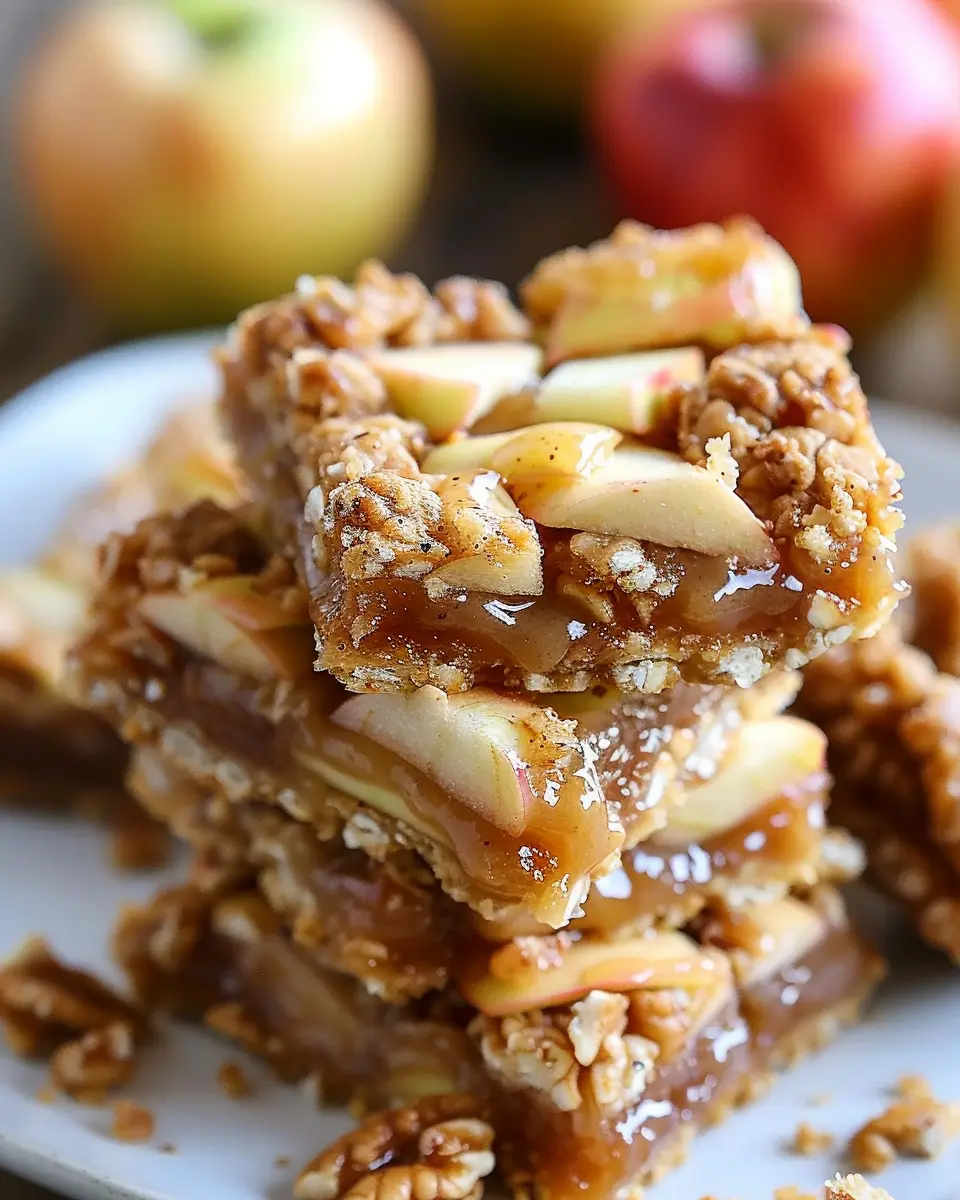
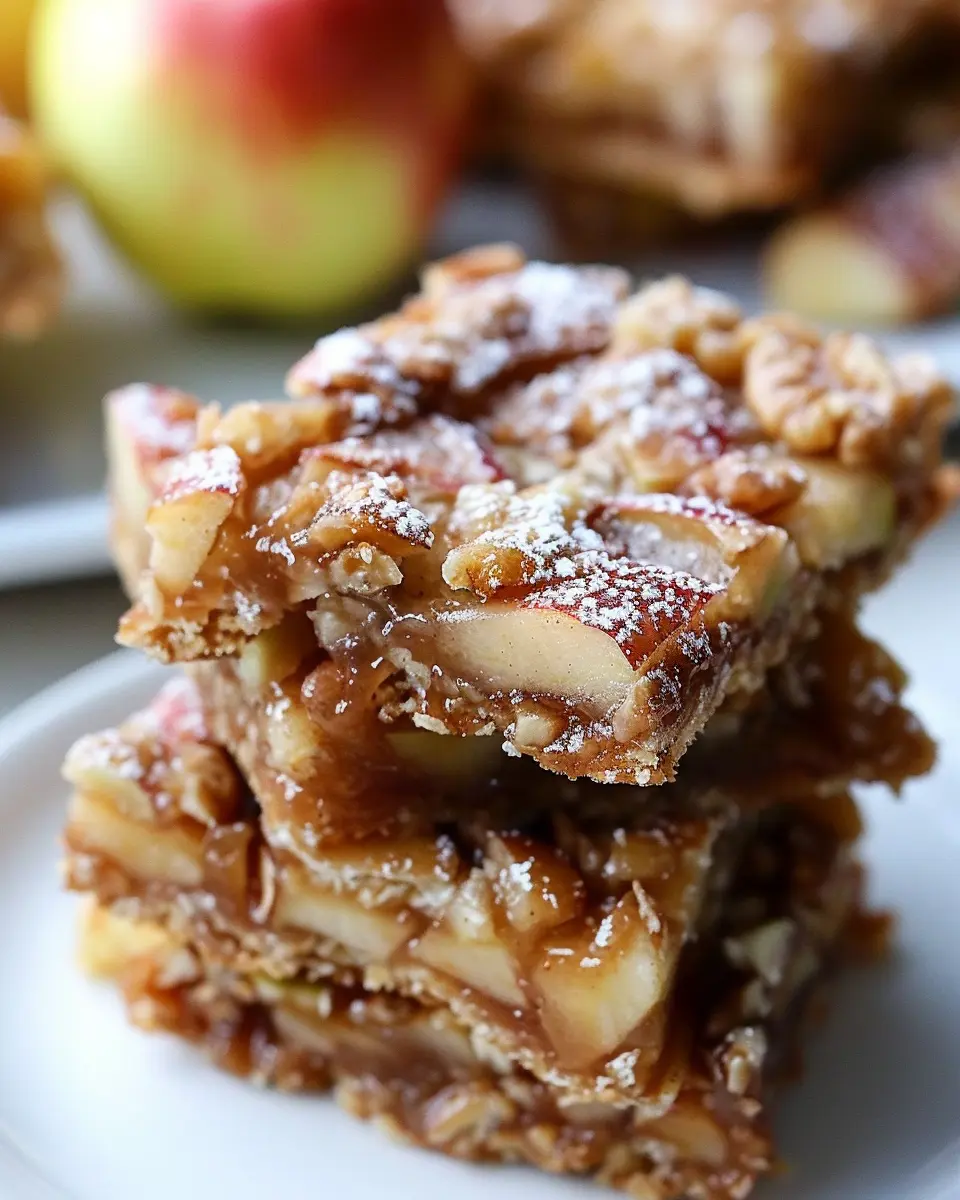
Variations on Apple Bars
Indulgent Caramel Apple Bars
If you’re craving a little extra sweetness, consider making caramel apple bars. This delightful twist incorporates a rich layer of gooey caramel atop your classic apple filling. To achieve the perfect balance, start with your favorite apple bar recipe and elevate it by drizzling warm caramel sauce over the top right before serving. Not only does this add a delicious flavor, but it also creates an indulgent presentation that’s sure to impress your guests. You might even want to sprinkle some sea salt on top for that trendy salted caramel touch!
Consider pairing your caramel apple bars with a scoop of vanilla ice cream for a comforting dessert. Plus, you can always enhance your bar by adding a handful of chopped nuts or oats for a satisfying crunch. For more tips on caramel techniques, check out this helpful guide from Serious Eats.
Delicious Gluten-Free Apple Bars
For those following a gluten-free lifestyle, you don’t have to miss out on the joy of apple bars. Simply substitute regular flour with a gluten-free blend or almond flour for a nutty flavor and pleasant texture. Don’t hesitate to explore options like coconut flour for a unique twist, or use oatmeal for a chewy consistency.
You can add some cinnamon and nutmeg to enhance the warm flavors typical of autumn. With the right ingredients, you’ll have scrumptious gluten-free apple bars that everyone can enjoy. Plus, if you’re looking for more alternatives and tips on gluten-free baking, sources like the Gluten-Free Council can provide great insights.
These variations are just the beginning! Feel free to experiment, mix and match, and discover your own favorites. Why settle for ordinary when you can make extraordinary?
Baking notes for Apple Bars
Baking apple bars can be a delightful experience, especially when you know a few handy tips. First, choose the right type of apples. A mix of tart and sweet varieties, like Granny Smith and Honeycrisp, will give depth to flavor. Did you know that using fresh, seasonal apples can elevate your dessert? For additional taste, sprinkle cinnamon and nutmeg generously.
Make sure your butter is at room temperature; this guarantees a smooth batter. If you’re short on time, consider using pre-made crusts—just look for high-quality options! For extra crunch, toss in some walnuts or oats into your filling. This not only enhances texture but also makes your apple bars more filling.
Lastly, let your bars cool completely before cutting. This patience pays off; trying to slice them too soon can lead to a crumbly mess! If you’re curious about the science behind baking, check out The Kitchn for more insights. Happy baking!

Serving Suggestions for Apple Bars
When it comes to enjoying apple bars, the options for enhancing their flavor and presentation are nearly endless! These delightful treats are perfect for various occasions, whether you’re hosting a cozy gathering or celebrating a special occasion.
Pairing Options to Elevate Your Experience
-
Dress It Up with Toppings
Consider serving your apple bars with a dollop of whipped cream or a scoop of vanilla ice cream. The creamy texture complements the warm spiciness of the apples beautifully, making for a sumptuous dessert experience. -
Fruit Compote or Sauce
A drizzle of caramel sauce or a homemade berry compote can take these bars to the next level. The sweetness of the sauce adds a vibrant contrast to the baked flavors. -
Beverage Pairings
Try enjoying your apple bars alongside a cup of spiced chai or a refreshing herbal tea. The warm spices in the tea will resonate with the flavors of the apple bars, creating a delightful harmony.
Incorporating these serving suggestions not only enhances your apple bars but turns any moment into a special occasion. For more inspiration, check out this guide on dessert pairings!
Tips for Making Perfect Apple Bars
Choose the Right Apples
When it comes to creating delightful apple bars, the type of apples you select can make a huge difference. Consider using a blend of sweet and tart varieties, like Honeycrisp and Granny Smith. This combination elevates the flavor profile and ensures each bite is balanced. Did you know that Honeycrisp apples have gained a reputation for their juiciness and crisp texture? Just ask any apple enthusiast, and they’ll rave about them!
Prepping Your Ingredients
It’s crucial to prep your ingredients ahead of time. Slice your apples uniformly to ensure even cooking, and don’t skimp on tossing them in lemon juice. This not only helps in retaining their vibrant color but also adds a hint of acidity that complements the sweetness. For more on how to prep apples effectively, check out this guide.
Mastering the Dough
Getting the dough just right can be a game-changer in your apple bars quest. Ensure your butter is cold, and don’t overmix—this keeps the texture flaky. You want to feel that irresistible crunch when you take your first bite! If you’re comfortable, try using a pastry cutter for a more rustic style. Plus, a touch of cinnamon in the dough can enhance that warm, inviting aroma.
Bake to Perfection
Finally, keep an eye on your baking time. Ovens can vary, so start checking your apple bars a few minutes before the suggested bake time. Perfect golden edges and slightly puffed tops are usually signs that they’re ready to be taken out.
With these tips in hand, you’re on your way to baking apple bars that friends and family will rave about! Happy baking!
Time details for Apple Bars
Preparation time
Making apple bars is a breeze! You’ll need about 15-20 minutes to prep your ingredients, peel those delicious apples, and assemble your filling. It’s a great time to turn on your favorite playlist or catch up on a podcast while you work.
Baking time
The baking process will take approximately 30-35 minutes, depending on your oven. You want those edges to be golden brown and the filling bubbling just a bit to ensure a perfect texture.
Total time
In total, you’re looking at around 45-55 minutes from start to finish. This makes apple bars a fantastic option for a quick dessert or a morning treat! For more tips on baking times and techniques, you can explore The Kitchn for expert insights.
Nutritional Information for Apple Bars
When you indulge in these delightful apple bars, it’s good to know what you’re treating your body to. Here’s a quick breakdown of their nutritional profile:
Calories
Each serving of our delicious apple bars contains approximately 180 calories. This makes them a satisfying yet guilt-free snack option that won’t derail your healthy eating plans.
Protein
You’ll enjoy about 2 grams of protein per bar. While they aren’t a significant source of protein, these bars can complement a balanced diet, especially when paired with a protein-rich beverage or meal.
Sodium
The sodium content is relatively low, averaging around 60 mg per serving. This makes apple bars an excellent choice for anyone monitoring their sodium intake.
For more detailed insights into maintaining a balanced diet, check out the USDA’s FoodData Central for nutritional databases. Remember, understanding what we eat is a vital step towards making healthier choices!
FAQs about Apple Bars
Can I use different types of apples?
Absolutely! One of the great things about apple bars is their versatility. You can mix and match apples to create a flavor profile that suits your taste. For a balance of sweetness and tartness, consider using a combination of sweet apples like Fuji or Honeycrisp with tart varieties such as Granny Smith. Each type adds its own unique flavor, making your apple bars even more delightful. For more on apple varieties, check out this detailed guide from The Spruce Eats.
How do I store leftover apple bars?
Storing your delicious apple bars is simple! Once they’ve cooled completely, wrap them tightly in plastic wrap or aluminum foil and place them in an airtight container. Leftovers can be stored at room temperature for a couple of days or in the refrigerator for up to a week. If you want to keep them longer, consider freezing them. Just make sure to layer parchment paper between bars and place them in a freezer-safe container for up to three months.
Can I make apple bars ahead of time?
Definitely! One of the benefits of apple bars is that they actually taste better after a day or two, as the flavors meld. You can prepare the bars the night before your gathering and simply let them cool and store them. Need to take it a step further? Bake the bars, let them cool, and freeze them a week in advance. When you’re ready to serve, just thaw and warm them up slightly in the oven for that fresh-baked taste. What could be easier?
Making apple bars ahead of time not only saves you stress on busy days, but it also lets you impress your guests with delightful treats ready to go!
Conclusion on Apple Bars
In summary, apple bars are a delightful treat that combines the comforting flavors of cinnamon and fresh apples in a portable format. They’re perfect for brunch, a cozy evening snack, or even as everyday desserts. The beauty of these bars is their versatility; you can easily tweak the recipe to incorporate your favorite ingredients.
Whether you choose to add nuts for a crunch or a splash of maple syrup for sweetness, the possibilities are endless! To elevate your serving experience, consider pairing these delicious bars with a dollop of Greek yogurt or a scoop of vanilla ice cream. Dive into this delightful creation, and experience why apple bars have become a sweet staple in many homes!
For more apple-inspired recipes, check out FoodNetwork or Bon Appétit to spark your culinary creativity.
PrintApple Bars: The Best Homemade Treat for Cozy Days
Enjoy delicious homemade apple bars that are perfect for cozy days. This recipe will fill your kitchen with warm aromas and provide a delightful treat for family and friends.
- Prep Time: 15 minutes
- Cook Time: 35 minutes
- Total Time: 50 minutes
- Yield: 12 servings 1x
- Category: Desserts
- Method: Baking
- Cuisine: American
- Diet: Vegetarian
Ingredients
- 2 cups all-purpose flour
- 1 cup granulated sugar
- 1 teaspoon baking powder
- 1/2 teaspoon baking soda
- 1/2 teaspoon salt
- 1 teaspoon cinnamon
- 1 cup unsalted butter, softened
- 2 large eggs
- 3 cups diced apples (about 3 medium apples)
- 1 cup chopped walnuts (optional)
Instructions
- Preheat your oven to 350°F (175°C) and grease a 9×13 inch baking dish.
- In a large bowl, mix together the flour, sugar, baking powder, baking soda, salt, and cinnamon.
- Add the softened butter and eggs to the dry ingredients and mix until combined.
- Fold in the diced apples and chopped walnuts.
- Pour the batter into the prepared baking dish and spread evenly.
- Bake in the preheated oven for 30-35 minutes or until golden brown and a toothpick comes out clean.
- Let cool before cutting into bars and serving.
Notes
- For a touch of flavor, consider adding a teaspoon of vanilla extract to the batter.
- Serve warm with a scoop of vanilla ice cream for an extra treat!
Nutrition
- Serving Size: 1 bar
- Calories: 250
- Sugar: 15g
- Sodium: 200mg
- Fat: 12g
- Saturated Fat: 7g
- Unsaturated Fat: 4g
- Trans Fat: 0g
- Carbohydrates: 34g
- Fiber: 2g
- Protein: 3g
- Cholesterol: 40mg
Keywords: Apple Bars, Homemade Treats, Cozy Desserts