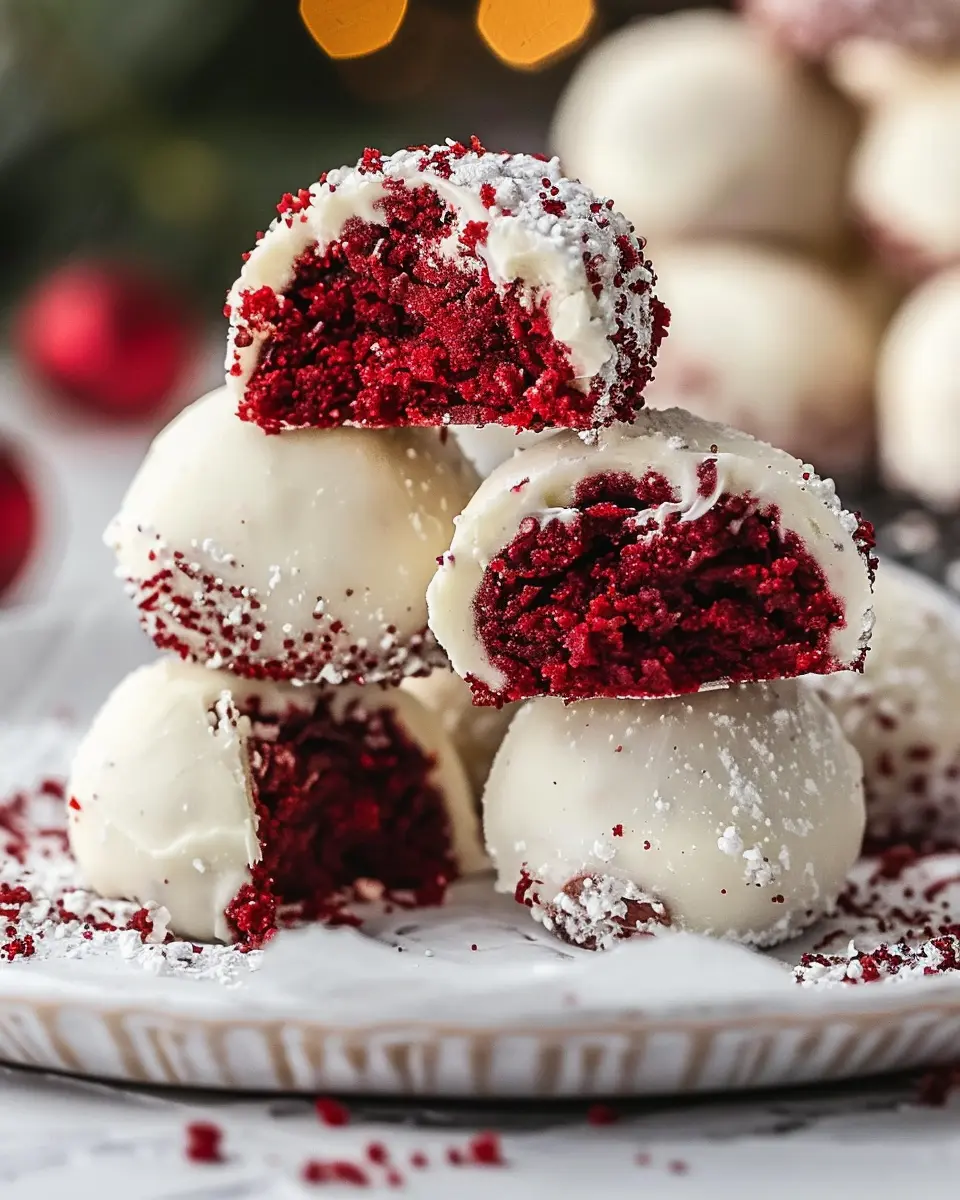
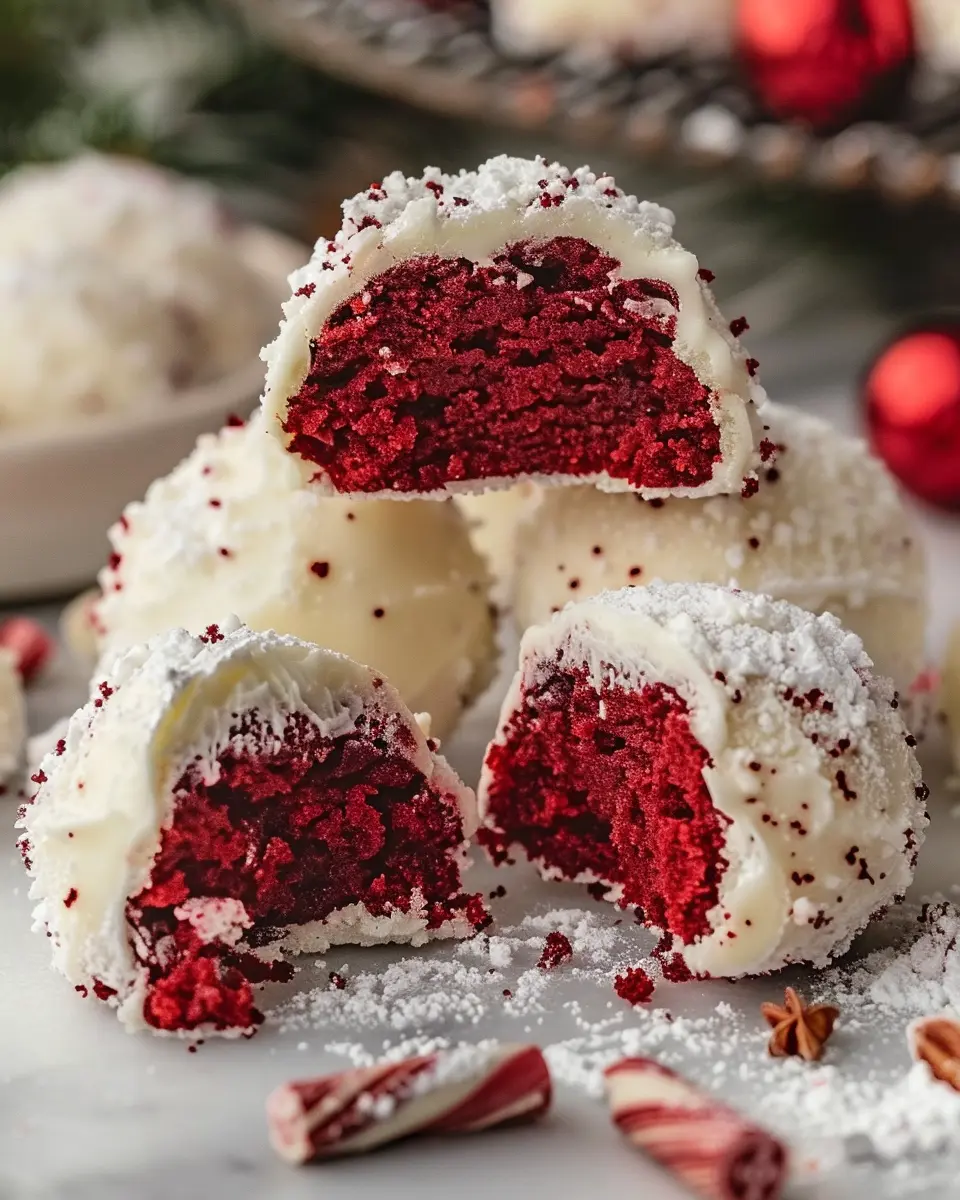
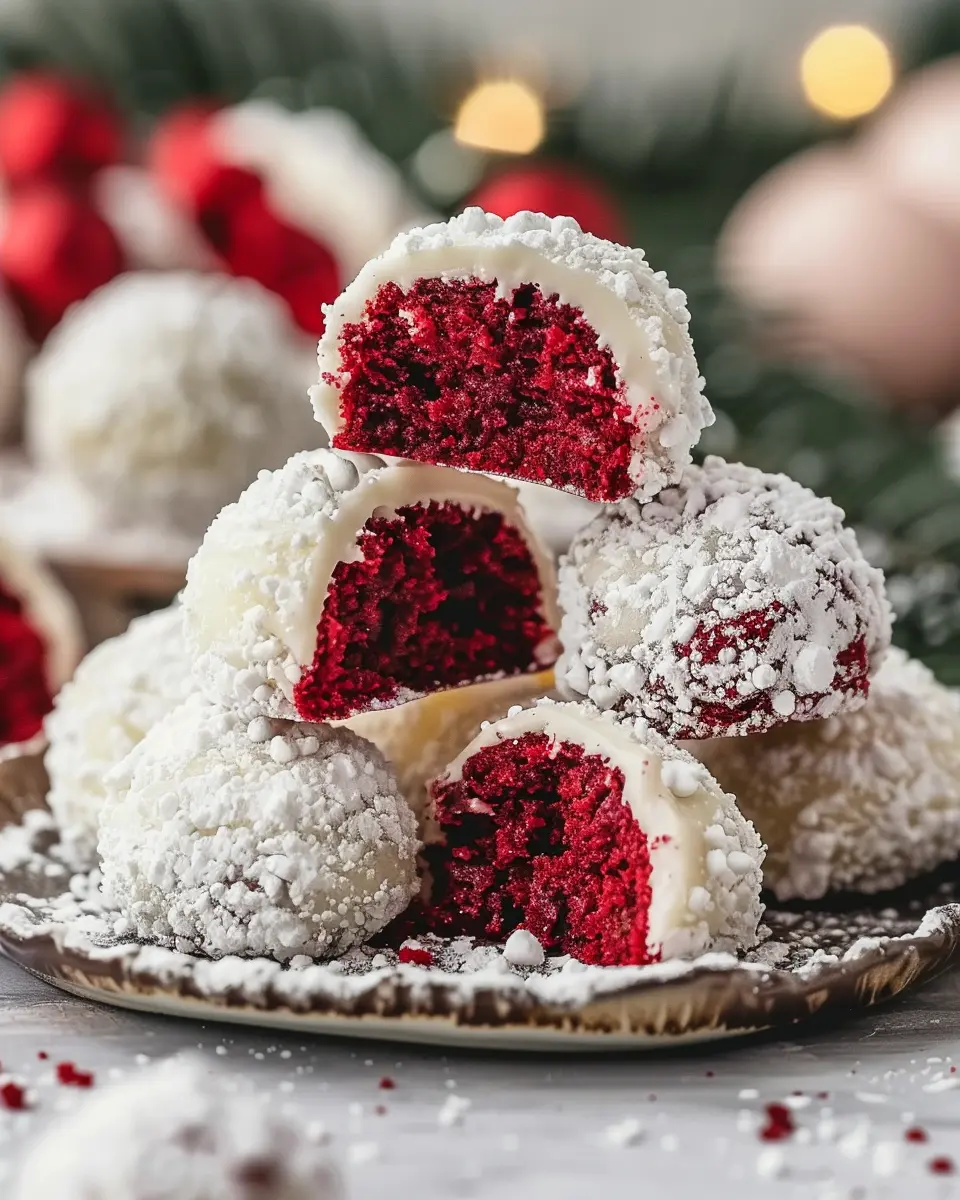
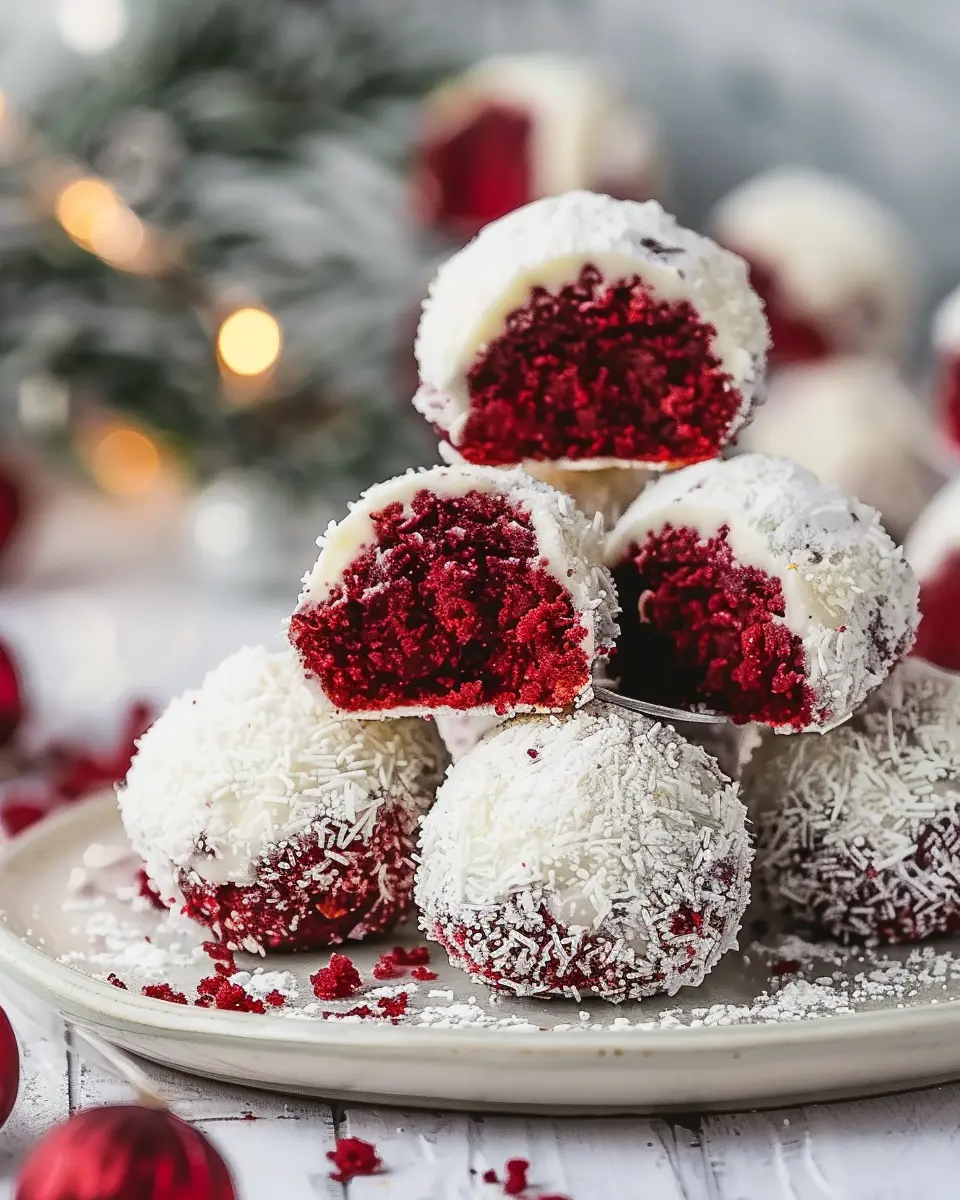
Introduction to Red Velvet Snowball Cookies
If you’re searching for a delightful treat to brighten your day, look no further than Red Velvet Snowball Cookies. These charming cookies, with their eye-catching hue and melt-in-your-mouth texture, are a playful twist on traditional snowball cookies. Imagine biting into a soft, crumbly cookie coated in a light dusting of powdered sugar, with the rich taste of red velvet and a hint of chocolate. Whether you’re baking for a festive gathering or treating yourself, these cookies are sure to become a beloved staple.
What are Red Velvet Snowball Cookies and why you’ll love them?
At their core, Red Velvet Snowball Cookies blend the classic flavors of red velvet cake with the fun and festive appeal of snowball cookies. Their unique flavor profile comes from the combination of cocoa powder, buttermilk, and that signature red color, achieved through food coloring or beet juice. With a delightful buttery base, these cookies offer a tender crumb that’s both rich and satisfying.
Why will you adore them? Here are some compelling reasons:
-
Visual Appeal: The vibrant red hue makes these cookies a stunning addition to your dessert table. They’re not just tasty; they’re visually enticing!
-
Versatile Treats: Perfect for various occasions, these cookies fit seamlessly into holiday celebrations, birthday parties, or even a cozy evening in. You can serve them with coffee, tea, or even a refreshing berry-infused drink to complement their sweetness.
-
Easy to Make: You don’t need to be a baking expert to whip up these cookies. The recipe is straightforward, making it an ideal choice for both novice and seasoned bakers.
If you’re curious about the delightful history and evolution of cookie variations, check out this insightful article on cookie history, which adds depth to your understanding of these cherished treats.
So, gather your ingredients, unleash your inner baker, and let’s dive into the recipe for Red Velvet Snowball Cookies. Trust me, with these cookies in your repertoire, you’ll have a baking hit on your hands that friends and family will rave about!
Ingredients for Red Velvet Snowball Cookies
Creating the perfect batch of Red Velvet Snowball Cookies starts with the right ingredients. Let’s dive into what you’ll need to make these delightful treats shine.
Essential ingredients for the cookie dough
To whip up the cookie dough, gather the following essentials:
- All-purpose flour: The base of your cookies, providing structure.
- Cocoa powder: Just a hint to deliver that chocolatey flavor.
- Granulated sugar: Sweetness is key for balance.
- Butter: Adds richness and tenderness.
- Eggs: For binding and moisture.
- Baking powder: Helps the cookies rise to perfection.
- Red food coloring: The star that gives these cookies their signature hue.
- Salt: Enhances all the flavors.
Each component plays a vital role in achieving that delicious melt-in-your-mouth experience.
White chocolate filling components
For the creamy surprise inside your Red Velvet Snowball Cookies, you’ll need:
- White chocolate chips: The star of the filling—sweet and smooth.
- Cream cheese: Adds a tangy richness that pairs beautifully with the chocolate.
Combining these ingredients creates a delightful contrast against the cookie’s texture.
Optional coating ingredients
Want to elevate your cookies even further? Consider these optional ingredients for the coating:
- Powdered sugar: For a classic snowy finish.
- Cocoa powder: For a more decadent touch.
- Chopped nuts or sprinkles: If you’re feeling festive!
These ingredients not only enhance the visual appeal but also offer an exciting texture that makes every bite more enjoyable.
So, what do you think? Are you ready to gather these ingredients and embark on your baking adventure? Your guests (or just your taste buds) will be thrilled! For more cookie inspiration, you can check out resources like Food52 or Serious Eats for additional tips.
Preparing Red Velvet Snowball Cookies
Red Velvet Snowball Cookies are a delightful twist on traditional snowball cookies, bringing a stunning red hue and subtle chocolate flavor to your dessert table. Perfect for holidays or any festive gathering, these cookies are not just a feast for the eyes; they’re incredibly simple to make. Let’s dive into the process!
Gather Your Ingredients
Before you dive into mixing and baking, take a moment to gather all your ingredients. This makes the cooking process seamless and more enjoyable. Here’s what you’ll need:
- ½ cup unsalted butter, softened
- ¾ cup granulated sugar
- 1 large egg
- 1 teaspoon vanilla extract
- 2 cups all-purpose flour
- ¼ cup cocoa powder
- ½ teaspoon baking powder
- ½ teaspoon salt
- 1 tablespoon red food coloring
- ½ cup shredded coconut (optional)
- Powdered sugar for coating
Having all your ingredients ready not only enhances your efficiency but also ensures a smooth flow in your baking process. If you’re curious about the origins of snowball cookies, check out this interesting read on dessert history.
Mix the Dry Ingredients
In a medium bowl, whisk together the flour, cocoa powder, baking powder, and salt. This step is crucial because blending your dry ingredients helps distribute the leavening agents evenly, ensuring that your cookies rise beautifully. Remember to sift the cocoa powder to eliminate any clumps, as we want a consistent texture throughout the cookies.
Cream the Butter and Sugar
In a large mixing bowl, use an electric mixer to cream the softened butter and granulated sugar until light and fluffy. This should take about 3-4 minutes. Why is this important? Well, the air you incorporate here will help your cookies rise and have a nice texture. Once creamed, beat in the egg, vanilla extract, and red food coloring until everything is thoroughly combined. This will give your cookies that luscious red velvet color we’ve all come to love.
Combine Wet and Dry Ingredients
Gradually add the dry mixture to your butter and sugar mixture. Mix on low speed until just combined. Be careful not to overmix; otherwise, your dough could become tough. At this point, you can fold in any extras like shredded coconut if you choose to opt for that flavor boost.
Chill the Dough
Chilling the dough is a step that many bakers either love or dread, but it’s essential here. Wrap the dough in plastic wrap and refrigerate for at least 30 minutes. Chilling helps solidify the butter, which ensures your cookies maintain their shape while baking.
Shape and Fill the Cookies
Once your dough has chilled, it’s time to shape the cookies! Preheat your oven to 350°F (175°C). Use a tablespoon to scoop out dough and roll it into balls. If you want a surprise in the middle, consider adding a small piece of chocolate or nut. Just flatten the ball, place the filling in the center, and then wrap the dough around it to form a sealed ball.
Bake to Perfection
Place your shaped cookies on a parchment-lined baking sheet, leaving space between them for spreading. Bake for 12-15 minutes or until the edges are set and the tops are just firm to the touch. If you want to make sure they’re perfectly baked, keep a close eye on them during the last few minutes.
Coat in Powdered Sugar and Coconut
Once out of the oven, let your cookies cool on the baking sheet for about 5 minutes. Then, while they’re still warm, roll them in a bowl of powdered sugar mixed with shredded coconut if using. This not only makes them look dazzling but adds a delightful sweetness that balances the chocolate flavor.
And there you have it—Red Velvet Snowball Cookies that are striking and delicious! Whether you’re indulging yourself or sharing them at a gathering, they’re sure to impress. Happy baking!
Variations on Red Velvet Snowball Cookies
When it comes to Red Velvet Snowball Cookies, there’s a delightful world of variations you can explore that will cater to different tastes and dietary needs. Let’s dive into some creative options that can elevate your cookie experience.
Red Velvet Snowball Cookies with Cream Cheese Filling
Imagine taking a bite of your Red Velvet Snowball Cookies only to uncover a luscious cream cheese filling inside. This variation adds an extra layer of flavor that balances the sweetness with a creamy tang. To make them:
- Prepare your dough: Follow your base recipe but chill it slightly before shaping.
- Create the filling: Beat together softened cream cheese, powdered sugar, and a splash of vanilla extract until smooth.
- Assemble: Scoop a small dough ball, flatten it, place a dollop of filling in the center, and encase it before rolling into a ball and baking.
Not only does this version look stunning, but the surprise filling can make your cookies the star of any gathering. You can find some great tips on crafting perfect fillings at sources like The Kitchn.
Gluten-free Red Velvet Snowball Cookies
For those embracing a gluten-free lifestyle, you can still enjoy these rich cookies without compromising on taste. Start by swapping traditional flour for a quality gluten-free blend, which typically combines various flours for the best texture. Here’s a quick guide to get started:
- Choose your flour: Look for a gluten-free all-purpose flour that contains xanthan gum for better binding.
- Follow the recipe: Simply replace the flour in your original Red Velvet Snowball Cookies recipe with your gluten-free alternative.
With these adjustments, you can indulge in the same beloved flavors without the gluten. Check out guides available from reputable sites like Gluten-Free Living for tips on baking with gluten-free ingredients.
Both of these variations will surely impress your friends and sweeten any occasion!
Baking Notes for Red Velvet Snowball Cookies
Tips for Ensuring Soft Cookies
To achieve perfectly soft Red Velvet Snowball Cookies, keep these tips in mind:
- Chill the Dough: Allowing your dough to chill for at least 30 minutes helps prevent the cookies from spreading too much while baking. This step is crucial for maintaining their lovely shape.
- Don’t Overbake: Your cookies should look slightly underbaked when you pull them from the oven. They’ll firm up as they cool on the baking sheet, ensuring that melt-in-your-mouth texture everyone loves.
- Use Fresh Ingredients: Always check the freshness of your baking soda and flour. This can make a significant difference in how your cookies turn out.
Storing and Freezing Your Cookies
Once your Red Velvet Snowball Cookies have cooled, proper storage is key:
- Short-term Storage: Keep your cookies in an airtight container at room temperature. They should stay fresh for about a week.
- Freezing for Later: For longer storage, freeze the dough in individual cookie portions. When you’re ready to bake, simply preheat your oven, place them on a sheet, and bake straight from the freezer—just add a minute or two to the baking time!
For more information about cookie freshness and storage tips, check out this article from the USDA.
Serving suggestions for Red Velvet Snowball Cookies
Perfect pairings for your cookies
When it comes to serving your Red Velvet Snowball Cookies, the right accompaniments can elevate the experience. Pair these velvety treats with:
- Creamy Hot Chocolate: The richness of hot chocolate complements the cookies’ texture perfectly. Consider using artisanal brands for an extra touch.
- Coffee or Espresso: A robust coffee can offset the sweetness while enhancing the chocolatey undertones of the cookies. Try a medium roast for a balanced flavor.
- Decadent Ice Cream: Vanilla bean or cream cheese ice cream adds a refreshing touch. You could even make a dessert sandwich with your cookies!
For more pairing ideas, you can check out sources like Epicurious which often offers delightful suggestions for baked goods.
Creative presentation ideas
Presenting your Red Velvet Snowball Cookies can be just as fun as making them! Here are some ideas to wow your guests:
- Festive Cookie Jars: Layer the cookies in a glass jar with a ribbon tied around it; they make charming gifts.
- Platter Arrangements: Arrange cookies on a decorative platter, garnished with edible flowers or sprigs of mint. This adds a touch of elegance.
- Themed Parties: Serve them at holiday gatherings with themed decor. Think red and white table settings for a lovely visual cue!
With these ideas, you’re sure to impress friends and family, making your cookies the star of the show. Remember, it’s not just about the taste—presentation matters too!
Tips for Making Perfect Red Velvet Snowball Cookies
Baking Red Velvet Snowball Cookies can be a delightful experience, but a few common missteps can turn your culinary adventure into a frustrating one.
Common Pitfalls to Avoid
-
Overmixing the Dough: It’s tempting to mix until perfectly smooth, but overmixing can lead to tough cookies. Aim for just combined for that perfect texture!
-
Skipping Chilling Time: Don’t rush this step! Chilling the dough allows the flavors to meld and helps the cookies hold their shape, preventing them from spreading too much during baking.
-
Not Using Fresh Ingredients: Stale baking powder or flour can ruin your cookies. Always check the freshness of your ingredients for a yummy result!
Tools That Can Make Your Baking Easier
Investing in a few essential tools can streamline your cookie-making process.
-
Silicone Baking Mats: These mats ensure even baking and make it easy to transfer your cookies without sticking.
-
Cookie Scoop: A medium-sized cookie scoop helps in portioning your dough, ensuring uniform sizes that bake evenly.
-
Kitchen Scale: Weighing your ingredients can improve accuracy and consistency, leading to more successful batches.
For more baking tips and tools, you can refer to reputable sources like the King Arthur Baking Company or Bake from Scratch. Happy baking with your Red Velvet Snowball Cookies!
Time details for Red Velvet Snowball Cookies
When you’re ready to bake your delicious Red Velvet Snowball Cookies, understanding the time commitment will help you plan your baking adventure perfectly!
Preparation time
To get started, set aside about 15 minutes for preparation. This includes gathering your ingredients, mixing the dough, and rolling them into delightful little balls.
Baking time
The actual baking will take 12-15 minutes. You’ll want to keep a close eye on these beauties to ensure they achieve that perfect balance of softness and slight crispness.
Total time
In total, you’re looking at around 30 minutes from start to finish. Perfect for a cozy evening treat or an unexpected gathering! For more insights on baking times for different cookie types, check out Serious Eats. Let’s dive into these yummy Red Velvet Snowball Cookies!
Nutritional information for Red Velvet Snowball Cookies
Calories per cookie
When indulging in Red Velvet Snowball Cookies, each cookie typically contains about 120–150 calories. This makes them a delightful treat, perfect for sharing or enjoying during special occasions without completely derailing your daily intake.
Breakdown of key nutritional elements
These cookies not only satisfy your sweet cravings but also pack some interesting nutritional elements, including:
- Fats: Usually around 6-8 grams, primarily from butter, contributing to that rich texture.
- Carbohydrates: Expect about 18-20 grams, primarily from the sugar and flour that give these cookies their signature sweetness.
- Proteins: Each cookie contains about 2-3 grams, thanks to the addition of eggs.
- Fiber: With 0.5-1 gram, they aren’t a high-fiber snack, but they’re still a fun treat.
For more insights on balanced nutrition, you can check out the USDA’s Dietary Guidelines. Enjoying these cookies in moderation can make for a delightful addition to your dessert lineup!
FAQs about Red Velvet Snowball Cookies
Can I substitute ingredients in the cookie recipe?
Absolutely! When it comes to baking, ingredient substitutions can help you tailor the recipe to your needs. For the Red Velvet Snowball Cookies, you can opt for alternative flours like almond or oat flour if you want a gluten-free option. Additionally, canola oil or coconut oil can replace butter for a dairy-free version. If you’re out of buttermilk, a mix of milk and vinegar makes a great substitute. Don’t hesitate to get creative—your taste buds might thank you!
What’s the best way to store these cookies?
Storing your delicious Red Velvet Snowball Cookies properly is key to keeping them fresh. Place the cookies in an airtight container at room temperature for up to a week. If you need to keep them longer, consider freezing them. Just layer the cookies with parchment paper in a freezer-safe container, and they’ll be good for about three months. When you’re ready to enjoy them, simply thaw at room temperature!
How can I make these cookies healthier?
Making Red Velvet Snowball Cookies a bit healthier is a piece of cake! Here are some tips:
- Replace Sugar: You can use honey, maple syrup, or coconut sugar for a more natural sweetener.
- Add Fiber: Consider incorporating ground flaxseed or chia seeds to boost nutritional content.
- Control Portions: Making smaller cookie balls can help with portion control, which is perfect if you’re watching your intake.
Baking doesn’t have to be unhealthy, and with a few adjustments, you can indulge guilt-free! For more detailed tips on ingredient substitutions, check out resources like The Kitchn or Healthline.
By following these guidelines, you’ll have a delightful treat that aligns with your tastes and health goals. Happy baking!
Conclusion on Red Velvet Snowball Cookies
Why you should give these cookies a try today!
If you’re looking for a delightful treat that combines the festive flavors of red velvet cake with the charming texture of snowball cookies, then Red Velvet Snowball Cookies are a must-try! These cookies offer a unique spin on traditional holiday favorites, bringing rich color and flavor to your dessert table. They’re perfect for sharing at gatherings or simply enjoying with a cozy cup of coffee at home.
The best part? Their simplicity makes them an accessible option for beginner bakers and seasoned pros alike. Give these cookies a shot today and let your taste buds rejoice! For more festive inspirations, check out Baker’s Joy or The Cookie Bible for tips and tricks!
PrintRed Velvet Snowball Cookies: Easy Indulgence for Any Occasion
These Red Velvet Snowball Cookies are a deliciously festive treat, perfect for any occasion. The rich red color and powdered sugar coating make them a beautiful addition to your dessert table.
- Prep Time: 15 minutes
- Cook Time: 12 minutes
- Total Time: 27 minutes
- Yield: 24 cookies 1x
- Category: Desserts
- Method: Baking
- Cuisine: American
- Diet: Vegetarian
Ingredients
- 2 cups all-purpose flour
- 1/2 cup cocoa powder
- 1 cup unsalted butter, softened
- 1 cup powdered sugar
- 1 large egg
- 1 teaspoon vanilla extract
- 1/2 teaspoon salt
- 1 cup chopped walnuts or pecans
Instructions
- Preheat the oven to 350°F (175°C).
- In a bowl, cream together the butter and powdered sugar until light and fluffy.
- Beat in the egg and vanilla extract, mixing well.
- In another bowl, whisk together the flour, cocoa powder, and salt.
- Gradually add the dry ingredients to the wet mixture, mixing until just combined.
- Fold in the chopped nuts.
- Roll the dough into 1-inch balls and place them on a baking sheet lined with parchment paper.
- Bake for 10-12 minutes or until set.
- Let cool slightly before rolling in powdered sugar.
Notes
- For a more intense flavor, add an extra teaspoon of vanilla.
- These cookies can be made a day in advance for better flavor.
Nutrition
- Serving Size: 2 cookies
- Calories: 120
- Sugar: 8g
- Sodium: 50mg
- Fat: 9g
- Saturated Fat: 5g
- Unsaturated Fat: 3g
- Trans Fat: 0g
- Carbohydrates: 14g
- Fiber: 1g
- Protein: 2g
- Cholesterol: 20mg
Keywords: Red Velvet Snowball Cookies, festive cookies, easy cookie recipe, dessert recipes