
Introduction to No-Oven Turkish Bread
Making your own no-oven Turkish bread can seem intimidating at first glance, but the truth is, it’s simpler and more rewarding than you might think! This flavorful bread, often used to complement various dishes, is a staple in Turkish cuisine and can elevate your meals to new heights. Beyond just being a tasty addition, homemade bread has the added benefit of being free from preservatives and artificial ingredients, making it a healthier choice for you and your loved ones.
Why make homemade Turkish bread?
Imagine biting into warm, fluffy bread right from your stovetop, infused with the delightful aroma of spices. Using traditional recipes, you can customize your no-oven Turkish bread to your liking by experimenting with flavors and toppings.
Here are a few reasons to give this bread a try:
- Freshness: Nothing beats the taste of bread made from scratch. Store-bought options can never match the freshness of homemade.
- Customization: Add herbs, spices, or even sesame seeds to create a version of Turkish bread that’s uniquely yours. You can even play with fillings—try different combinations of Turkey Bacon or Chicken Ham for your perfect sandwich.
- Skill Building: Making bread is not only a valuable skill but also offers you a creative outlet. Plus, your friends will be impressed with your newfound culinary talents!
According to The Institute of Culinary Education, the act of making bread is therapeutic, and the process can be a perfect way to unwind after a long day. Plus, engaging in cooking can foster a sense of community; you might just inspire your friends to join in and host a bread-making night!
If you’re short on time or simply don’t have a traditional oven, fear not! This no-oven Turkish bread requires just a few simple tools—a skillet or griddle is all you need. So whether you’re looking to make a delightful appetizer, an elegant sandwich, or a side for your favorite dish, this easy recipe will have you covered.
Stay tuned for the full recipe, and get ready to enjoy warm, fluffy bread that brings the taste of Turkey right into your kitchen!

Ingredients for No-Oven Turkish Bread
Making no-oven Turkish bread is an easy and delightful culinary experience, perfect for boosting your weeknight meals or weekend brunch. Here’s what you’ll need:
- All-Purpose Flour: 3 cups of quality all-purpose flour act as the base for this delicious bread.
- Warm Water: About 1 cup—be sure it’s warm, not hot, to ensure your yeast activates properly!
- Yeast: 2 teaspoons of active dry yeast will give your bread that lovely rise and airy texture.
- Olive Oil: 2 tablespoons of extra virgin olive oil add flavor and richness—divine!
- Sugar: 1 teaspoon to feed the yeast and enhance browning for that beautiful golden crust.
- Salt: 1 teaspoon brings all the flavors together; it’s essential!
- Optional Toppings: Consider topping with sesame seeds or za’atar for an extra flavor kick that’s oh-so-delicious.
These ingredients come together to create a soft, pillowy bread that’s ideal for serving alongside your favorite dishes. For more details on the process, check out this fantastic article on bread-making basics. Enjoy your culinary adventure!
Step-by-Step Preparation of No-Oven Turkish Bread
Making no-oven Turkish bread is not only an exciting culinary adventure, but it also opens up a world of warm, fluffy goodness that you can enjoy anytime, anywhere. Whether you want to impress your friends at a cozy gathering or simply treat yourself to a fresh-baked delight, follow this step-by-step guide to create mouthwatering bread without ever turning on your oven.
Gather Your Ingredients
Before diving into the mixing, let’s make sure you have everything you need. The beauty of this no-oven Turkish bread recipe lies in its simplicity. Gather the following ingredients:
- 3 cups all-purpose flour
- 1 packet (2¼ tsp) active dry yeast
- 1 teaspoon sugar
- 1 teaspoon salt
- 1 cup warm water (about 110°F or 43°C)
- 2 tablespoons olive oil (plus more for cooking)
- Optional: sesame seeds or nigella seeds for topping
Having everything at arm’s reach makes the cooking process seamless and enjoyable. Did you know that yeast can be a bit picky about temperature? If you’re not sure about your water’s warmth, a kitchen thermometer can be your best friend.
Mixing the Dry Ingredients
Now that you have all your ingredients, it’s time to jump in! In a large mixing bowl, combine the following dry ingredients:
- Flour
- Sugar
- Salt
- Yeast
Mix these together using a whisk or fork, ensuring there are no clumps. This step is vital because it allows the yeast to evenly distribute throughout the flour, empowering your no-oven Turkish bread to rise beautifully.
For more information on how yeast works, feel free to check out this expert article.
Creating the Dough
Once your dry ingredients are well-mixed, create a well in the center of the mixture. Gradually pour in the warm water and olive oil, stirring with a wooden spoon or your hands. This is where the transformation begins! You’ll want to mix until it forms a rough dough. It should be slightly sticky but not overly wet.
For those with a more adventurous spirit, adding herbs like rosemary or thyme can elevate your no-oven Turkish bread experience. What are your favorite flavors?
The Important Rise
Cover your bowl with a clean kitchen towel or plastic wrap, placing it in a warm, draft-free area. Let your dough rise for about 1 hour or until it has doubled in size. It’s super important to be patient during this step, as it allows the gluten to develop, resulting in that light and airy texture we all crave.
While you’re waiting, why not get a head start on planning what you’ll pair your bread with?
Shaping the Bread
Once your dough has risen, it’s time to shape it. On a lightly floured surface, gently punch down the dough to release the air. Divide it into equal portions—about six, depending on how large you want the bread. Roll each portion into a ball, then flatten it gently into a disk, about ½-inch thick. This part can be fun! Think of it as your mini bread-making workshop.
Cooking in a Skillet
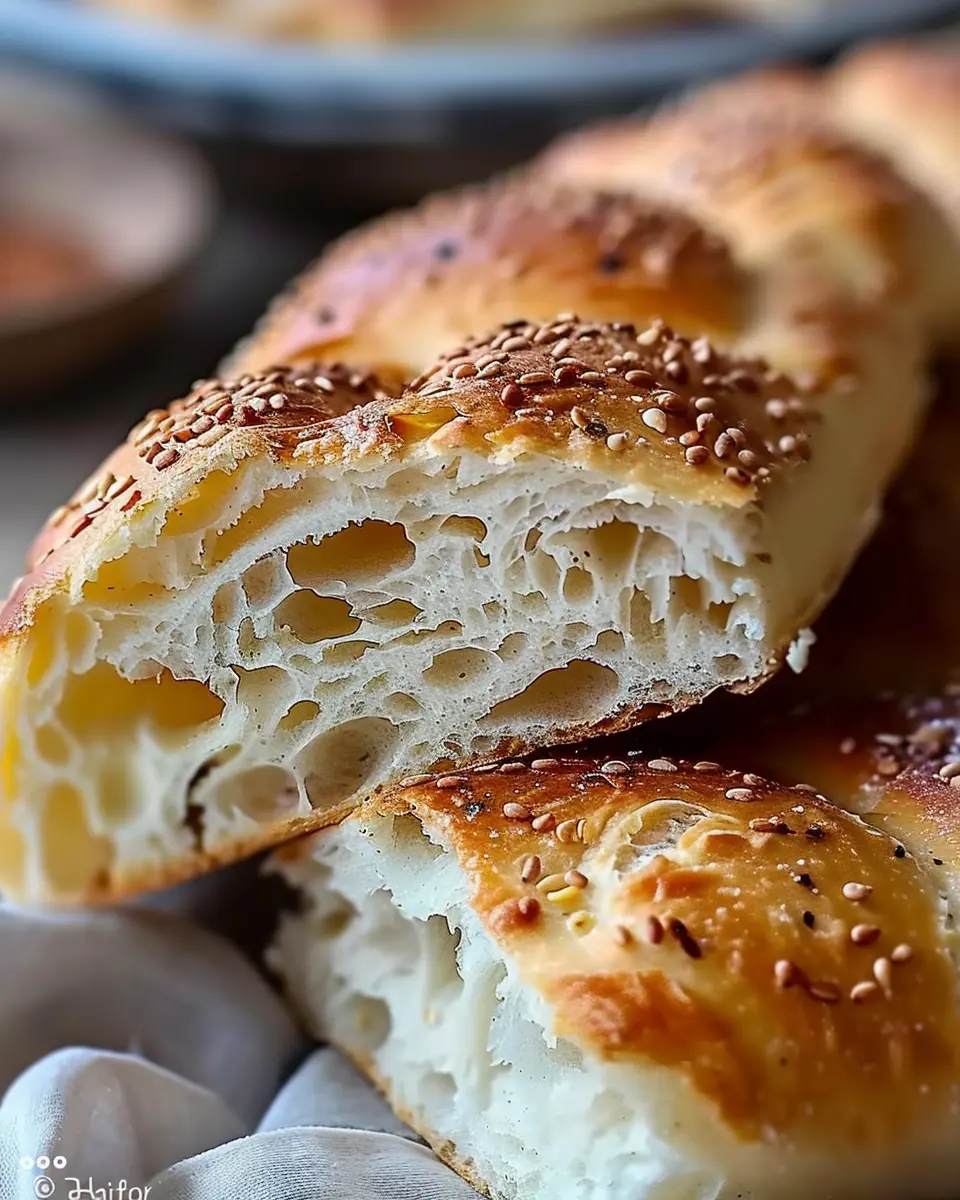
Now comes the exciting part—cooking! Heat a skillet over medium heat and brush it lightly with olive oil. Once the oil is hot, add your flattened disks, cooking each side for about 3-4 minutes or until they’re golden brown and puffed up. It’s best to keep an eye on them, as all stovetops can vary. This simple technique delivers perfectly cooked, no-oven Turkish bread that retains its fluffy interior while achieving a perfect outer crust.
Adding That Finishing Touch
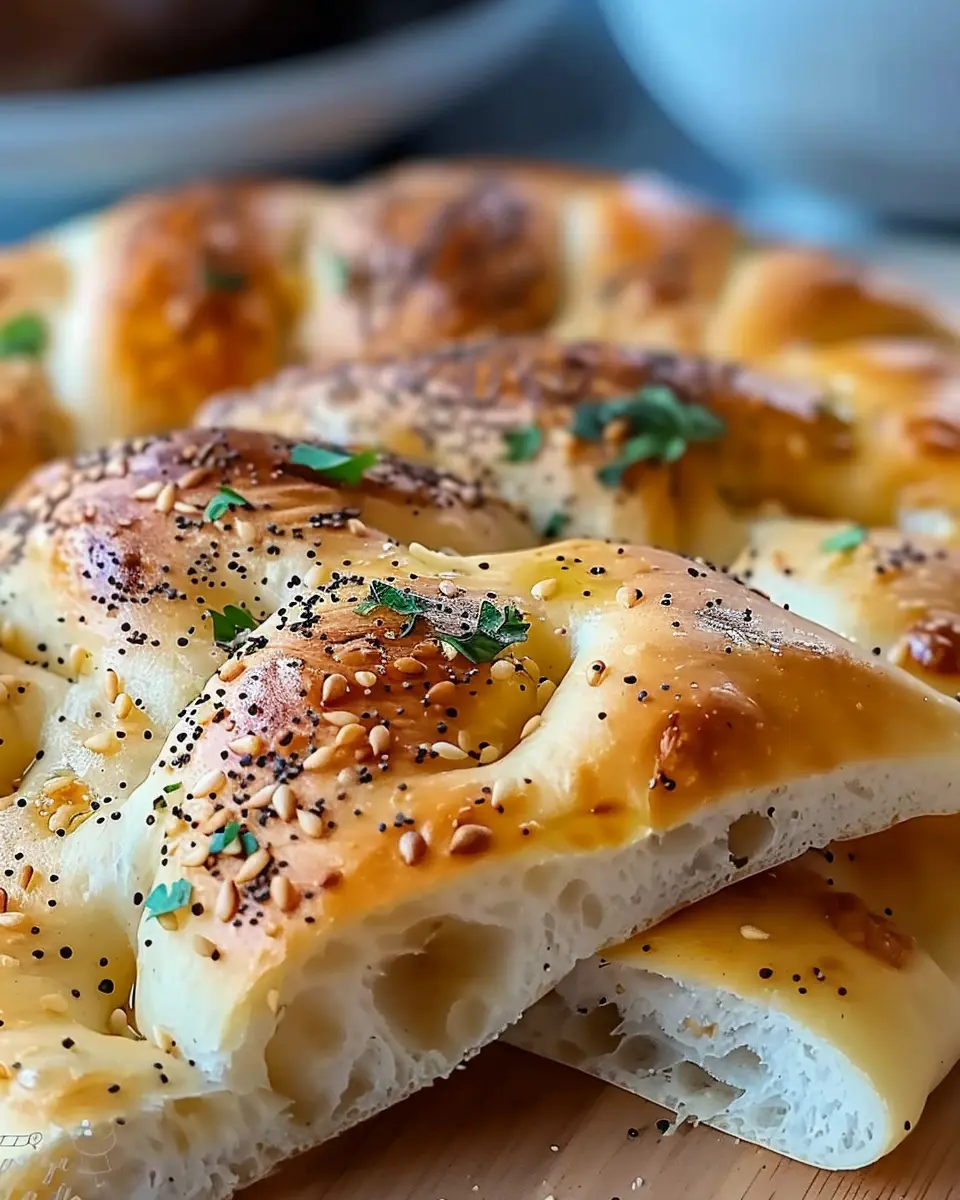
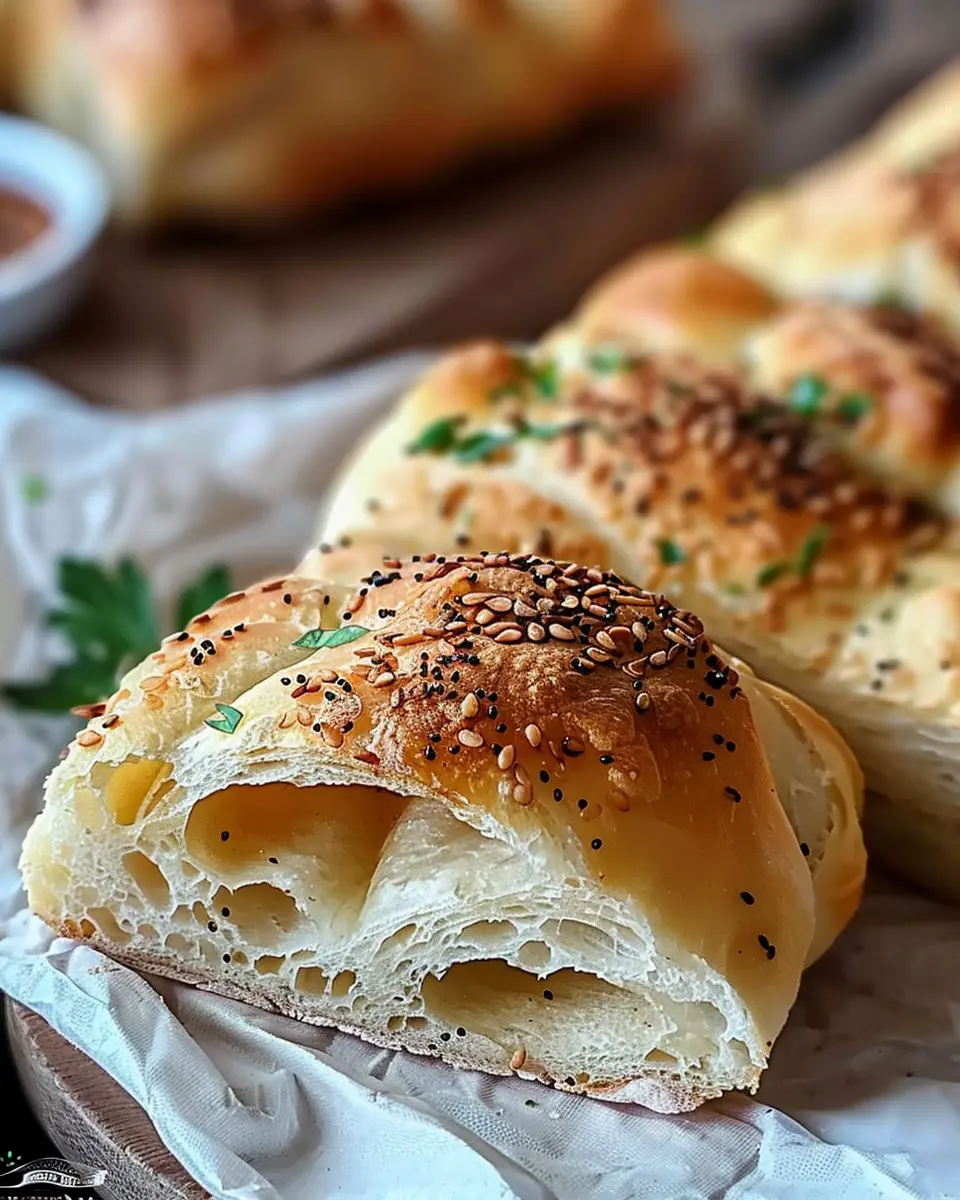
After pulling your bread from the skillet, you might want to brush them with a bit more olive oil and sprinkle with sesame or nigella seeds if using. This finishing touch adds both flavor and a lovely aesthetic that your friends will admire.
Allow the bread to cool slightly before tearing or slicing. When served warm, it’s bursting with delicious possibilities. Picture yourself enjoying this alongside creamy hummus, savory spreads, or even with turkey bacon and chicken ham for a fulfilling meal!
With just a few simple steps, you’ll find yourself enjoying fresh, homemade no-oven Turkish bread in no time. Don’t forget to share your creations and experiment with flavors—it’s all part of the fun!
Variations on No-Oven Turkish Bread
Flavored Butters and Toppings
Transform your no-oven Turkish bread into a flavor-packed experience by exploring an array of flavored butters and toppings. Imagine spreading a rich garlic herb butter right onto warm bread; it’s heaven in each bite! For something a bit more exotic, try mixing softened butter with zesty lemon and herbs like dill or parsley. This simple yet delightful topping not only enhances the bread’s flavor but also brings a burst of freshness that will elevate your dish.
Don’t stop there! You can also experiment with toppings like:
- Feta cheese mixed with olives for a Mediterranean twist
- Smashed avocado spiced with a sprinkle of chili flakes
- A dollop of hummus accompanied by sliced cucumbers and tomatoes
These additions not only enhance the taste but also provide an exciting visual element to your meal.
Incorporating Herbs and Spices
Another fantastic way to personalize your no-oven Turkish bread is to incorporate aromatic herbs and spices directly into the dough. Consider adding a tablespoon of dried oregano, cumin, or even smoked paprika to give the bread an inviting warmth and depth of flavor. Fresh herbs, such as chopped cilantro or basil, can also be folded in just before cooking for a burst of color and zest.
Have you ever thought about the health benefits? According to the Herbal Medicine Research Center, many herbs not only enhance flavor but also add nutritional value. So, by simply changing up your herb game, you’ll not only make your Turkish bread tastier but also more nutritious.
Experiment with these variations and discover your favorite combination! This approach not only makes the bread unique but also allows for creativity in the kitchen. Happy baking!
For more ideas on delightful toppings, check out Serious Eats for inspired suggestions.
Cooking Tips and Notes for No-Oven Turkish Bread
Achieving the Best Texture
To get that perfect, fluffy interior and a slightly crispy crust in your no-oven Turkish bread, be mindful of the cooking process. Use a skillet over medium heat for the best results. Make sure to cover your pan while cooking. This helps create steam, allowing the bread to rise beautifully. Additionally, let your dough rest for at least 30 minutes before cooking; this promotes gluten development, which improves texture.
Storage Tips for Leftovers
If you happen to have leftovers (which is rare with this delicious bread!), store them properly to retain their freshness. Wrap your no-oven Turkish bread in parchment paper, then place it in an airtight container or a resealable bag. This will keep it soft for about two days at room temperature. For longer storage, consider freezing. Simply slice the bread, wrap it well, and pop it in the freezer. When you’re ready to enjoy it again, just thaw and reheat on the skillet for that fresh-baked taste.
For more great tips on bread storage, check out this comprehensive guide from Serious Eats.
Serving Suggestions for No-Oven Turkish Bread
Pairing with Dips and Spreads
When it comes to enjoying your no-oven Turkish bread, think about all the delicious dips and spreads that can elevate your meal. Hummus, tzatziki, or a vibrant roasted red pepper dip are fantastic options to consider. Their rich flavors complement the bread’s soft texture beautifully. Plus, you can whip up these spreads in no time. For a twist, try pairing it with a Turkish muhammara—a savory blend of walnuts and red peppers that packs a delightful punch. You’ll impress your friends at your next gathering!
Using as a Wrap or Side
This versatile no-oven Turkish bread can also shine as a wrap or side for various dishes. Think about crafting wraps with turkey bacon, grilled veggies, and a dollop of creamy avocado spread. Or serve it alongside creamy soups, salads, or your favorite grilled proteins like chicken ham. The possibilities are endless! This bread not only satisfies hunger but also adds a delightful touch to your meals. Why not experiment with different fillings and spreads to discover your new favorite combo?
For more inspiration, consider checking out The Kitchn’s guide on serving hummus and other dips!
Time Breakdown for No-Oven Turkish Bread
When you’re ready to whip up some delicious no-oven Turkish bread, knowing how to manage your time can make the process smooth and enjoyable.
Preparation Time
To get started, you’ll need about 15 minutes to gather all your ingredients and mix them together. This is the fun part—feel free to get creative by adding your favorite herbs or toppings!
Cooking Time
Once your dough is ready, it takes about 20 minutes to cook. You’ll want your stovetop skillet nice and hot to achieve that perfect golden crust.
Total Time
In just around 35 minutes, you’ll have a freshly baked no-oven Turkish bread that’s perfect for enjoying with your favorite spreads or as a side to your meals. Quick, right? If you’re interested in exploring more delicious bread ideas, check out King Arthur Baking for inspiration!
Nutritional Facts for No-Oven Turkish Bread
Calories per serving
When it comes to enjoying no-oven Turkish bread, you’ll find that it’s a relatively diet-friendly option. Each serving generally ranges around 150-200 calories, making it an ideal accompaniment to your meals or snacks without overindulging.
Key nutritional components
This delightful bread isn’t just a treat for your taste buds; it also packs a nutritional punch:
- Carbohydrates: Generally, no-oven Turkish bread contains about 30-35 grams of carbs per serving, providing essential energy for your daily activities.
- Protein: You’ll get around 4-6 grams, especially if you add toppings like turkey bacon or chicken ham, boosting its protein content substantially.
- Fats: With healthy fats from olive oil, expect about 3-5 grams, supporting heart health.
- Vitamins & Minerals: It’s a good source of B vitamins and iron, promoting overall wellness.
The balance of these nutrients makes this bread not only delicious but also a versatile option for your diet. For more insights on the importance of whole grains, check out Healthline’s article. Pair it with fresh veggies or hummus for a satisfying, healthy treat!
Frequently Asked Questions about No-Oven Turkish Bread
Can I use whole wheat flour?
Absolutely! Using whole wheat flour in your no-oven Turkish bread is a great way to add more fiber and nutrients to your meal. However, keep in mind that it may result in a denser texture compared to all-purpose flour. If you’d like to incorporate whole wheat, you might want to experiment with a combination of both flours to achieve the perfect balance of flavor and texture. Remember, cooking is all about creativity, so don’t hesitate to make it your own!
How can I store no-oven Turkish bread?
To keep your freshly baked no-oven Turkish bread as delightful as the day you made it, store it in an airtight container or a zip-top bag. It’s best enjoyed within 2-3 days at room temperature. If you’re looking to keep it for a longer period, consider freezing it! Simply wrap the cooled bread tightly in plastic wrap before placing it in a freezer-safe bag. It can last up to three months in the freezer. When you’re in the mood for a warm slice, just thaw it and reheat as detailed below.
What’s the best way to reheat it?
The best way to reheat your no-oven Turkish bread is to slice it and warm it on a skillet over medium heat for a couple of minutes on each side. This method revives the bread’s soft, pillowy texture while giving it a delightful crisp. Alternatively, you can also use a microwave for a quick fix. Just pop it in for 10-15 seconds—perfect for when you’re in a rush!
If you have more questions, check out resources like the BBC Good Food for additional tips on bread making and storage.
Conclusion on No-Oven Turkish Bread
Recap and encouragement to try out the recipe
There you have it—your introduction to making no-oven Turkish bread. This delightful recipe not only saves you time but also gives you that fresh-baked flavor without the hassle of preheating an oven. Imagine impressing friends with warm, fluffy bread right off the stovetop!
As you try this recipe, consider experimenting with various toppings or fillings—think Turkey Bacon, fresh herbs, or even savory cheeses. Don’t hesitate to share your creations or ask questions in the comments. For more tips and variations, check out resources like BBC Good Food or Food Network. Happy baking, and enjoy your culinary adventure!
PrintNo-Oven Turkish Bread: Easy Recipe for Homemade Delight

Learn how to make delicious No-Oven Turkish Bread with this easy recipe that lets you enjoy homemade bread without the need for baking.
- Prep Time: 10 minutes
- Cook Time: 15 minutes
- Total Time: 45 minutes
- Yield: 6 servings 1x
- Category: Bread
- Method: Stovetop
- Cuisine: Turkish
- Diet: Vegetarian
Ingredients
- 3 cups all-purpose flour
- 1 tablespoon instant yeast
- 1 teaspoon sugar
- 1 teaspoon salt
- 1 cup warm water
- 2 tablespoons olive oil
Instructions
- In a large bowl, mix the flour, yeast, sugar, and salt.
- Add warm water and olive oil, then stir until a dough forms.
- Knead the dough on a floured surface for about 5 minutes.
- Let the dough rest for 30 minutes, covered with a cloth.
- Divide the dough into equal portions and shape into rounds.
- Cook the rounds in a non-stick pan over medium heat for about 3-4 minutes on each side.
- Serve warm with your choice of dips.
Notes
- The dough can be flavored by adding herbs or spices.
- Experiment with different toppings like sesame seeds or za’atar.
Nutrition
- Serving Size: 1 piece
- Calories: 150
- Sugar: 0g
- Sodium: 200mg
- Fat: 3g
- Saturated Fat: 0.5g
- Unsaturated Fat: 2g
- Trans Fat: 0g
- Carbohydrates: 28g
- Fiber: 2g
- Protein: 4g
- Cholesterol: 0mg
Keywords: No-Oven Turkish Bread, Easy bread recipe, Homemade bread